Code, Git, Action! Testing and Releasing w/ Github Actions

Hello friends, (once again) it’s been a while.
In my latest project, roll-rust, I’ve made use of a very nice feature from Github, called Github Actions, and would very much like to share some of what I’ve learned with all my theoretical readers.
To do this, we’ll first cover some of the main concepts of Github Actions, and then breakdown the one used to test, compile and release roll-rust
Let’s get to it!
A Quick Overview of Github Actions
If you are aware of other DevOps and CI/CD solutions, Github Actions will be somewhat familiar. If not, don’t get intimidated by the buzzwords, in essence GH Actions are a way to automate tasks involving your repo, so that they run whenever a certain event occurs.
A concrete example: Whenever there is a pull-request, the code and dependencies are downloaded to a virtual machine, tests are run, and depending on their result the code can be automatically merged or a maintainer notified.
Workflows
A Workflow is a YAML, located under a .github/ directory inside your repository, that has a special syntax used to configure the components of GH Actions.
Think of a Workflow as the Script where you will define what you’ll do and what needs to happen so it is activated.
You can have more than one Workflow, each defining different tasks with different triggers.
Events
Events are the conditions needed to activate your workflow.
Most of them represent some change in the repository (a push, a pull-request, fork, issue, etc.) but can also be scheduled, or manual (press a button).
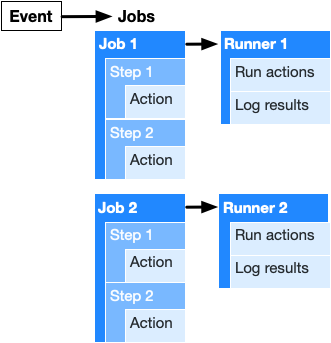
Jobs
If the Workflow is a Script, then a Job is a “function” (with the added caveat that they run only once and have other limitations). They describe the environment, common variables and configuration to run Steps, series of individual shell commands or Actions (see below).
One important thing to note: Each Job Runs on completely separate virtual machines (called Runners). By default, they run independently, share no data, and if any of them fail, the Workflow fails. All of these behaviours can be changed, however.
Actions
Actions are the atomic components of a Workflow, they are the ones that actually do the work that you need.
Under the hood they are made up of “Dockerized” code, or pure Javascript, that interact with your code via the Github API, but can call any publicly accessible API as well.
This means that actions have a lot of variation as to what they do, and that you can code your own actions. In fact, there’s and entire marketplace of available actions both “official” and user-made actions that you can call in your workflow.
Contexts and Expressions
When you need to set, access or evaluate variables in your Workflow, you use the Expression syntax $ to do so.
Variables are grouped in Contexts. Think of them as a Dictionary where the variables are stored, and accessed by name. There are many Contexts, check out this link for a complete list
Summing Up
Breaking Down the CD Workflow
Now, we’ll take a closer look on the Workflow used on roll-rust to provide Continuous Deployment. Continuous deployment is a fancy way to say that, if all goes well, the workflow will automatically publish a new version of our software.
Please, also note that this is a Workflow used in a small project, so the configurations should probably be tweaked to fit a bigger project better.
This workflow is composed of jobs that do the following whenever a new tag like ‘v1.0.0’ is pushed to the repository:
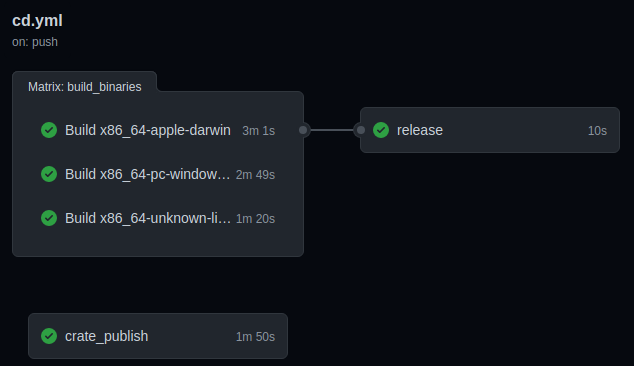
- Test our code and, if successful, publish it to crates.io, the main registry where Rust projects and libraries are hosted.
- Compile our source code into binaries for Linux, MacOS and Windows
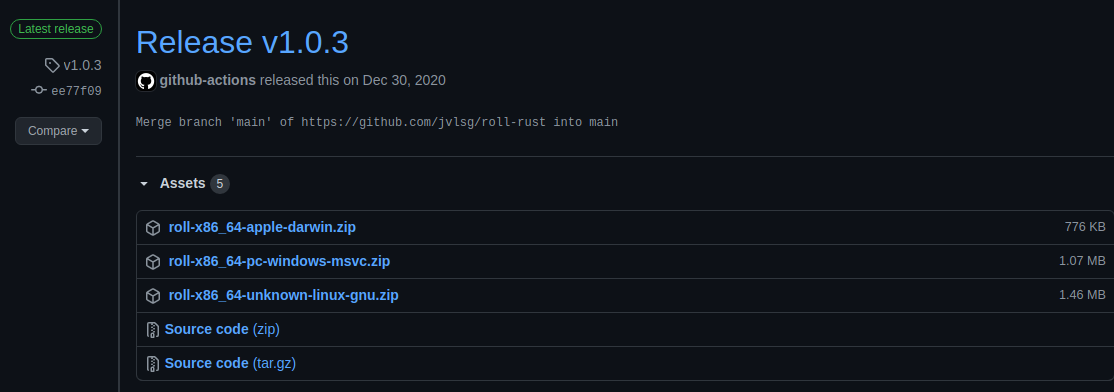
- Create a new Release on Github and upload the binaries the new Release page
Now that we can see the forest for the trees, let’s zoom in and discuss each part of the workflow with more detail.
Triggering on git push --tags
on:
  push:
    tags:
      - 'v*.*.*'
With this configuration, we use Git’s Tagging system on the commits we want to use to trigger the workflow.
Testing and Publishing the Crate
  crate_publish:
    runs-on: ubuntu-latest
    steps:
    - uses: actions/checkout@v2
    - name: Login to Crates
      run: cargo login $
    - name: Build
      run: cargo build
    - name: Run tests
      run: cargo test --verbose
    - name: Publish Version
      run: cargo publish
This is the first Job per se. We configure it to be executed in a Ubuntu Runner. Then, we use the official checkout action to pull our repo and checkout to the default branch. (In retrospect, it would have been better to specify the tag on the checkout, or limit the triggering events to the default branch)
We then use run to execute shell commands that login to crates.io, build, test and publish the code. These are specific to the Rust programming language, and it’s important to note that Rust is pre-installed in Github’s runners. Depending on the language or dependencies we’re using, it would be necessary to add additional actions that properly configure the environment, as it is done in the next Job.
To check out what are the default runners and what they include, see this link
You can add repository secrets to your workflow, simply by invoking them with the secrets context.
Building the Binaries in different OSes
  build_binaries:
    strategy:
      matrix:
        job:
          - { os: macos-latest,   target: x86_64-apple-darwin,         use-cross: false }
          - { os: windows-latest, target: x86_64-pc-windows-msvc,      use-cross: false }
          - { os: ubuntu-latest , target: x86_64-unknown-linux-gnu,    use-cross: false }

    runs-on: $
    name: Build $

    steps:
      - uses: actions/checkout@v2
      - uses: actions-rs/toolchain@v1
        with:
          profile: minimal
          toolchain: stable
          override: true

      - name: Building to release
        uses: actions-rs/cargo@v1
        with:
          use-cross: $
          command: build
          args: --target $ --release --all-features --verbose
      - name: Uploading artifacts
        uses: actions/upload-artifact@v2
        with:
          name: roll-$
          path: |
            target/$/release/roll*
            !target/$/release/roll.d
strategy and matrix
Here’s where things get interesting. The strategy is simply a context that stores variables and configuration for that specific Job. The matrix variable inside is used to define alternate configurations that are valid for that Job. When we define this matrix, we are actually creating three different Jobs that share the same base “code”.
You can add variables of any name to the matrix and, perhaps unhelpfully to the reader, I called the “list of dicts” job. In each dict, os holds the name of the Runner the Job will run on, target holds the variable that the rust compiler uses to know what’s compiling for, and cross can be ignored because I didn’t put enough research to figure out how to use it.
One important thing, and also the reason a single “list of dicts” was used, whenever you place additional lists inside Matrix, you create a number of jobs based on the combination (or, the Cartesian Product if you’re feeling fancy) between them. And in our case, there wouldn’t be any sense in using MacOS to compile for Linux, etc.
Getting Rusty
In this job, the unofficial (but very helpful) rust actions are used to install the rust toolchain and package manager, as they weren’t both available to all runners during the time of development.
Filepaths and data sharing
Each job, after building the binary for it’s OS, needs to send the binary to the final job of the workflow. Since each job runs on a completely separate environment, the only way to share files between them is to first upload them somewhere else, and then download them.This is done using the official upload-artifact action, which temporarily stores your files inside Github.
In our case we define the path of the file we want to upload while excluding files used during the build (.d files)
One thing to note, the Job’s current working directory is, by default, the root of your repository.
Releasing and Uploading
  release:
    env:
      RELEASE_PREFIX: roll-
      MAC: x86_64-apple-darwin
      WIN: x86_64-pc-windows-msvc
      LINUX: x86_64-unknown-linux-gnu
    needs: build_binaries
    runs-on: ubuntu-latest

    steps:
      - uses: actions/checkout@v2

      - name: Download artifacts to CWD
        uses: actions/download-artifact@v2

      - name: Package Mac Binaries
        run: zip --junk-paths $$ ./roll-$/* README.md

      - name: Package Windows Binaries
        run: zip --junk-paths $$ ./roll-$/* README.md

      - name: Package Linux Binaries
        run: zip --junk-paths $$ ./roll-$/* README.md

      - name: Create Release
        id: create_release
        uses: actions/create-release@v1
        env:
          GITHUB_TOKEN: $
        with:
          tag_name: $
          release_name: Release $
          draft: false
          prerelease: false

      - name: Upload Mac Release
        id: upload-release-asset-mac
        uses: actions/upload-release-asset@v1
        env:
          GITHUB_TOKEN: $
        with:
          upload_url: $
          asset_path: ./$$.zip
          asset_name: $$.zip
          asset_content_type: application/zip

      - name: Upload Win Release
        id: upload-release-asset-win
        uses: actions/upload-release-asset@v1
        env:
          GITHUB_TOKEN: $
        with:
          upload_url: $
          asset_path: ./$$.zip
          asset_name: $$.zip
          asset_content_type: application/zip

      - name: Upload Linux Release
        id: upload-release-asset-linux
        uses: actions/upload-release-asset@v1
        env:
          GITHUB_TOKEN: $
        with:
          upload_url: $
          asset_path: ./$$.zip
          asset_name: $$.zip
          asset_content_type: application/zip
Dependent Jobs
By using the needs variable, we can make this job run only after the build_binaries finishes. This way we won’t cause an error by trying to upload files that don’t exist quite yet.
Using the download-artifact action to download all binaries to the CWD, we can start packaging them together with the README in zip files. (Once again in retrospect, for *NIX systems, packaging it in a .tar.gz file would be more appropriate, as it preserves the execution bit of the binary and spares the user the need to run chmod +x on the file)
Creating a release
Using the official create-release action, we use GITHUB_TOKEN (a special variable inside the secrets Context) and the tag that triggered the Workflow to create a new release. This action also sets the steps.create_release.outputs.upload_url variable with the URL that is needed to upload assets to the release.
Uploading artifacts
Now, we simply use the upload-release-asset together with the upload_url variable to upload each of our packages, configuring their name and MIME type in the process.
And that’s it!
Closing thoughts
One Job to package them all
You might be thinking the following
Why use only one Job to package and upload them all? Why repeat the same steps for the 3 OSes? Couldn’t we use a Matrix here to avoid “code repetition”?
The reason a single Job with “code repetition” was used is due to the fact that we need to run the create-release action only once (we just want to create a single release) and the fact that we need it upload_url it sets.
Remember that when we use a matrix, we are actually creating several Jobs, each running in it’s own separate machine. If each tries to create a release, the others won’t be able to do it, because it already exists, and will fail. If we create a release in a previous job, they won’t have access to the upload_url and fail as well.
Debugging your Workflow
As of this writing, debugging a Workflow is a painful process. The only way that I am aware of is to essentially “test in production”.
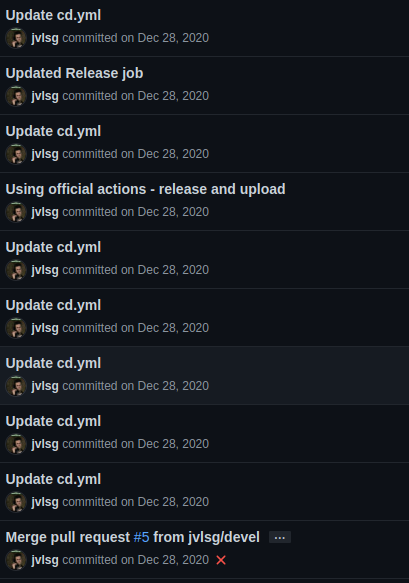
Add your workflow to your repo and start triggering it to see if it behaves as expected. Sometimes you write a wrong command, mess-up the workflow syntax, or mess-up indentation somewhere (yeah, thanks, YAML) and the whole thing falls apart. You find the error, or possible error, edit the YAML file, commit your code, push it and try it again, with no way to test it beforehand.
This means that every failed Workflow run will be stored in the “Actions” tab of your repository and your commit history will be filled with clutter, and so that the whole world can see your shame. Thankfuly, you can delete failed runs.
Maybe it was just my lack of personal experience with actions, still I cannot emphasize just how much of a headache this simple Workflow was.
“There’s already an action that does that!”
There is a large number of custom actions made by the community, many of them (in theory) would be able to skip many of the individual steps that were taken here. As a matter of fact, I tried to use many of them and pretty much all failed except the ones from actions-rs.
It wasn’t really easy to answer why each one of them failed without digging in their code, which wasn’t something I was particularly inclined to do with the headache of getting the workflow to work in the first place.
One thing I can attribute to pretty much all of them however, is that they had poor documentation. It’s not my goal to criticize anyone in particular, nor to be too harsh, these are projects that people create with their own time and energy and I have much respect for that. However, if you intend to create an Action so others can use it, or anything else for that matter, please put some special effort on the public documentation.
CI/CD is pretty neat when everything works
Heading says it all. Despite the headache, and recognizing some points of improvement in the workflow, I’m pretty satisfied with the final product.
 It just works!